Products
A PIM system serves as the central repository for all product-related data, allowing you to manage, enrich, and distribute information seamlessly.By mastering the creation and management of products.
In this guide, we'll walk you through the step-by-step process of leveraging your PIM system to create and manage products and their variants efficiently.
To learn more about Products, go to Key Concepts.
Step 1: Accessing Products
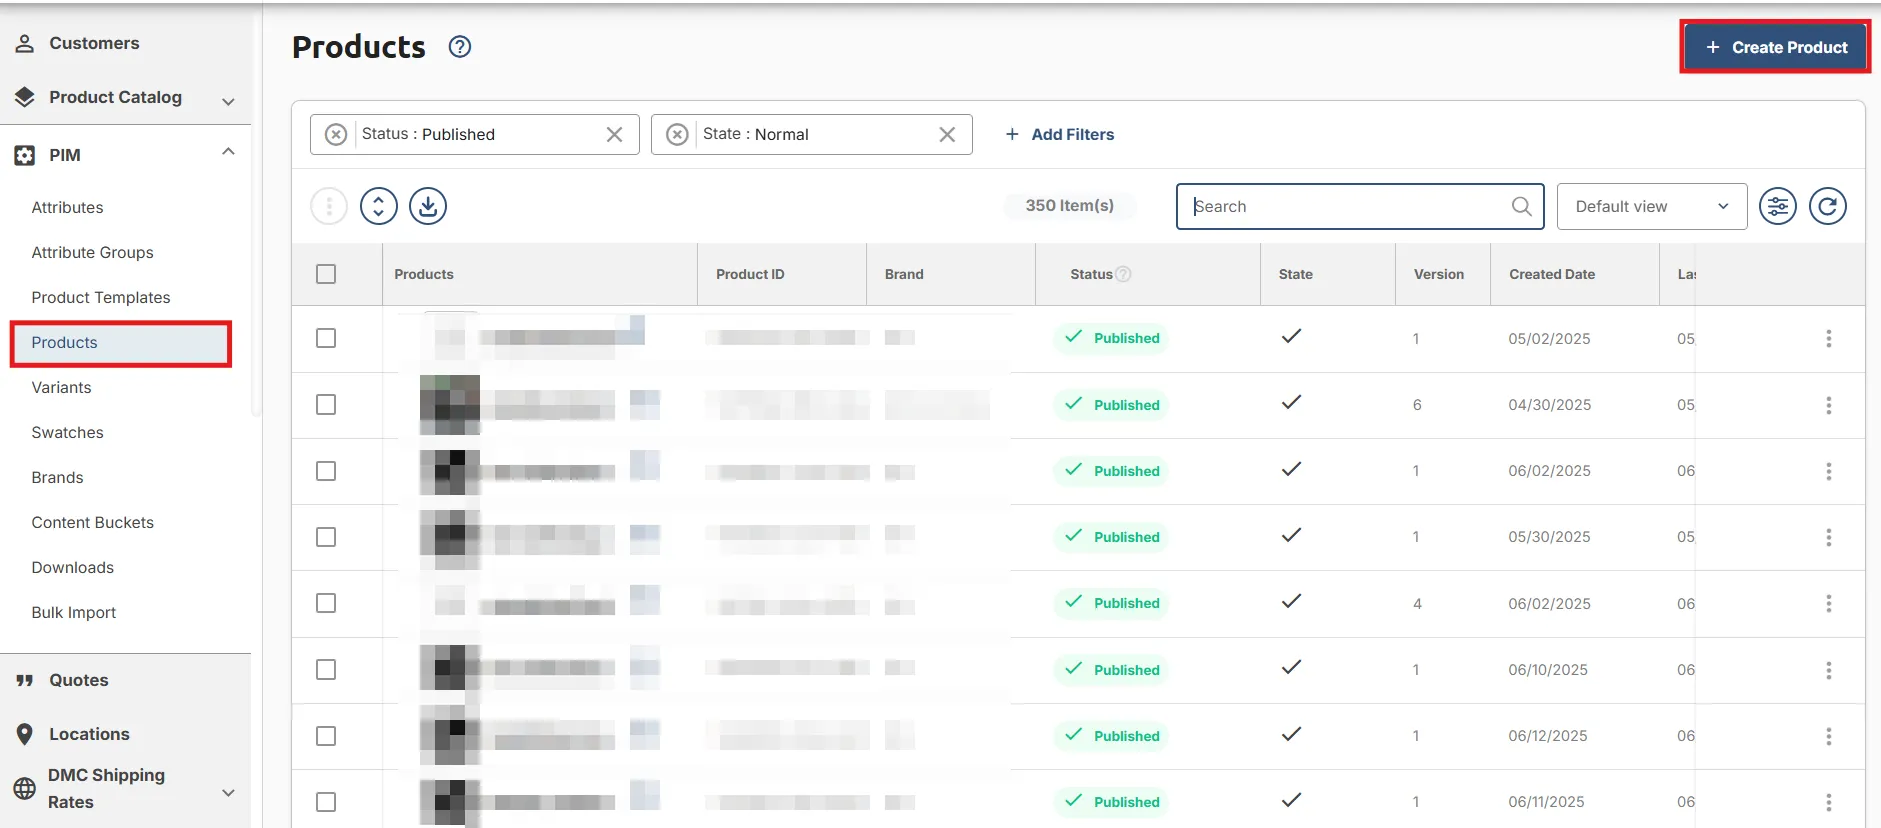
Upon logging in, navigate to the side menu of the UpStart Commerce Portal, go to PIM, and click on Products. Initiate the product creation process by clicking + Create Product in the top-right corner.
Step 2: Create New Product
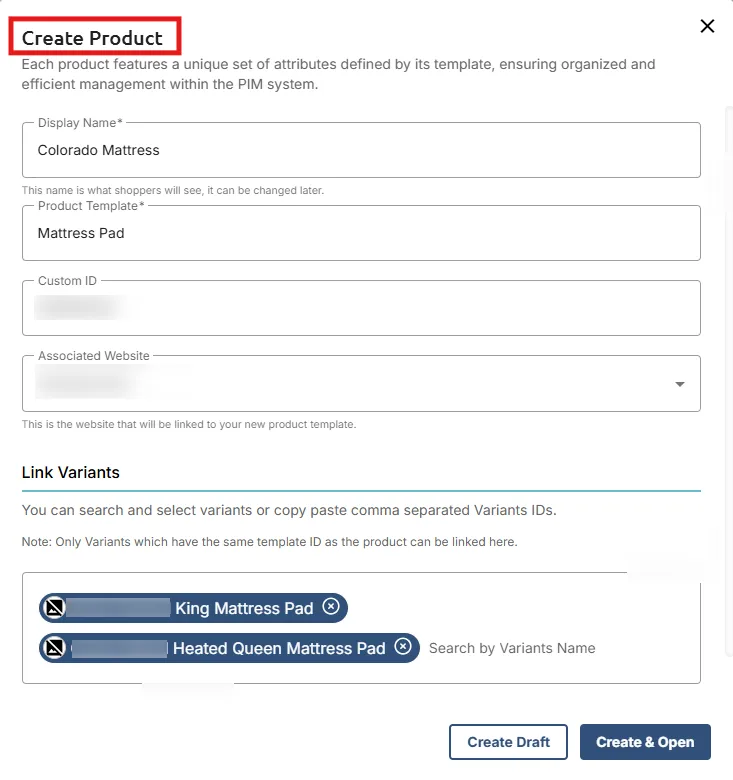
In the Product creation process, provide the following details:
- Display Name: Enter a Display Name that distinctly identifies the product and will be displayed on your site as a product.
- Product Template: Choose the appropriate product template for your product from the available dropdown options. This template provides the basic gray structure for your product.
- Custom ID: Enter a unique Custom ID that would help identify the product.
- Associated Website: Specify the website from the dropdown list. This is the site to which the new product will be linked.
- Link Variants: Link your variants with the product by searching and selecting them from the list, or by pasting comma-separated variant IDs for quick association.
Users can input a Custom ID for their product; however, if the Custom ID already exists, an error will occur. If no Custom ID is provided, the system will assign a randomly generated Product ID.
Step 3: Finalizing Product Creation
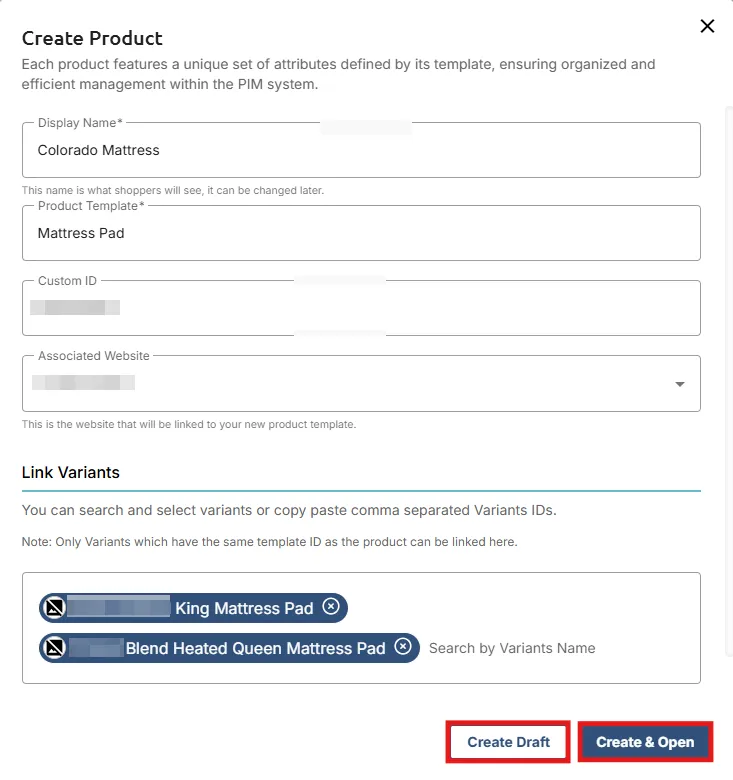
After completing the form, you are presented with two choices:
- Create Draft: Click the Create Draft button to save your product as a draft, keeping it unpublished on the portal. This allows you to revisit and edit the product details at your convenience before making it live for user visibility.
- Create & Open: Click on the Create & Open button, and you will be directed to the Product Details page. This is the preferred choice when you intend to make the product live and immediately utilize it on your site and the UpStart Commerce Portal.
Step 4: Configuring Product Details
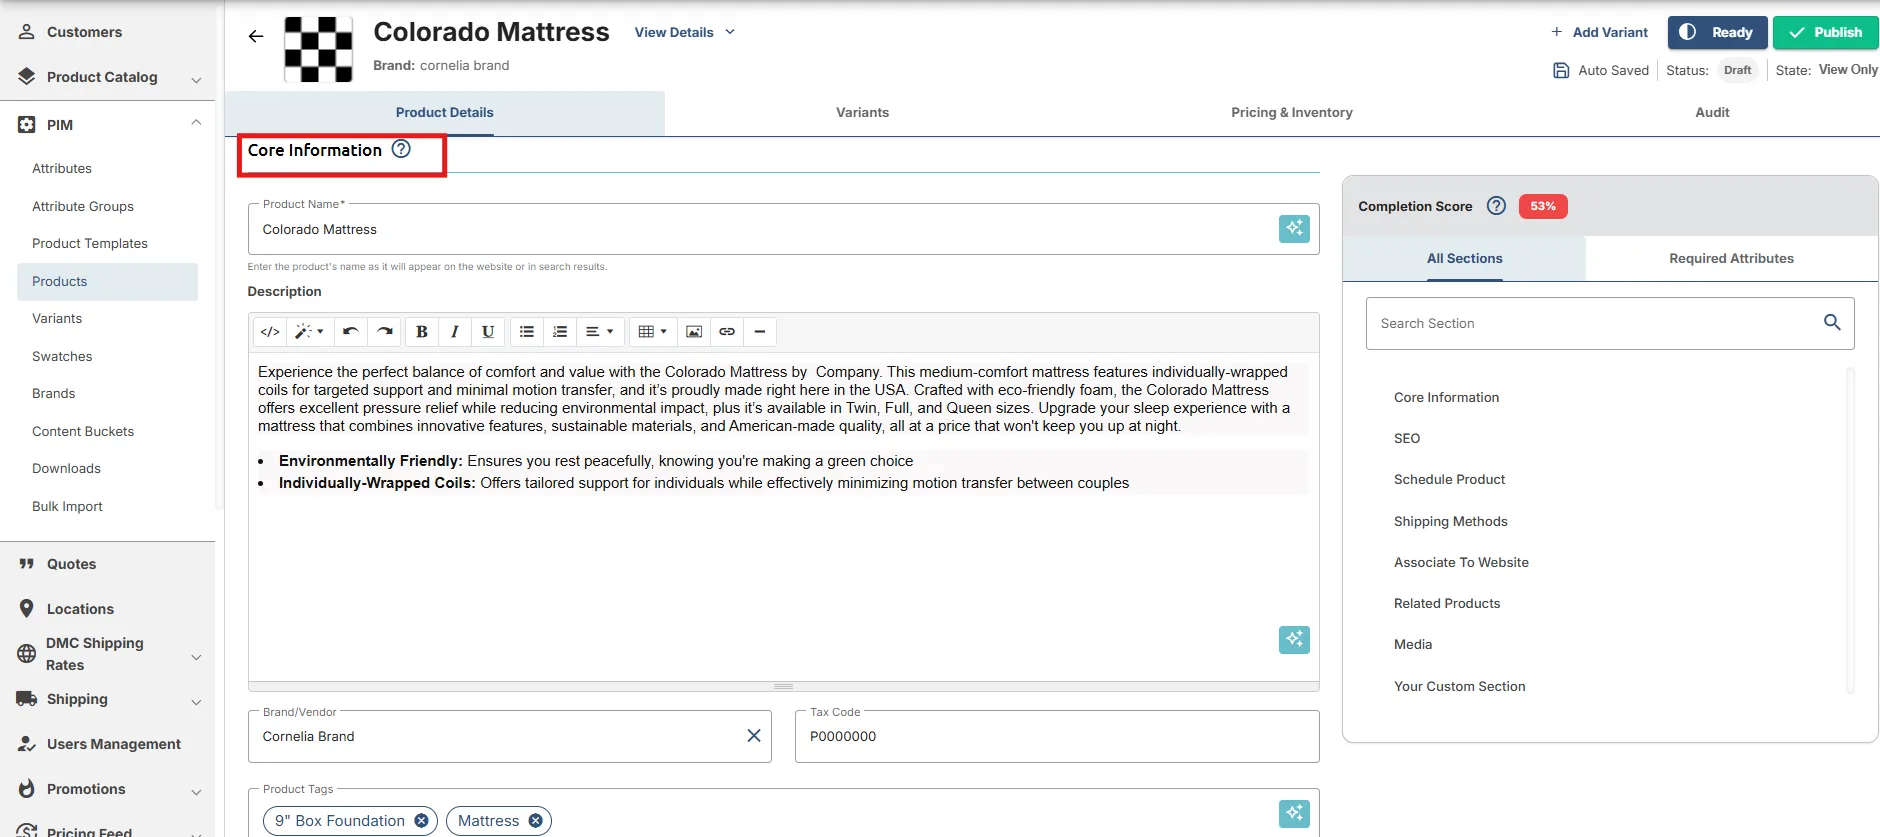
On the Product Details page, configure the product by providing essential information in the Product Details tab:
In the Core Information, provide the following details:
- Product Name: Enter the name of your product. This is the primary identifier that customers will see when browsing your inventory.
- Description: Enter a brief description of your product in two to three lines. Include features and specifications, and any other unique selling points for your potential customers.
- Brand/Vendor: Specify the brand or vendor associated with the product.
- Tax Code: Enter the applicable tax code for the product to ensure accurate tax calculations.
- Product Tags: Add relevant product tags to enhance searchability and improve SEO (Search Engine Optimization).
Tags are keywords or phrases that describe your product and help customers find it more easily when searching on your website or through search engines.
Completion Score View
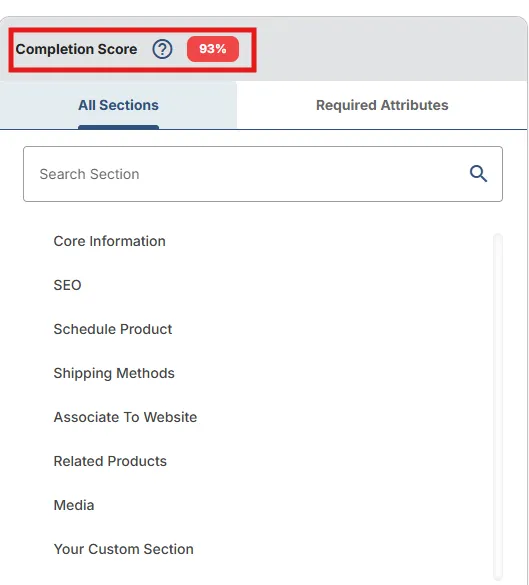
The Completion Score View, located in the bottom-right corner of the interface, provides a quick overview of all sections on the page and indicates the overall completion status of the product.Users can click on any section name (e.g., SEO) within the Completion Score View to automatically scroll to the corresponding section, allowing for faster navigation and easier editing.
It also displays the Percentage of information that has been filled out, helping users track their progress at a glance.
Additionally, a separate Required Attributes tab highlights all mandatory fields that must be completed for successful submission. Click this tab to view the list of required attributes and quickly identify and address any missing information.
Implement SEO Practices
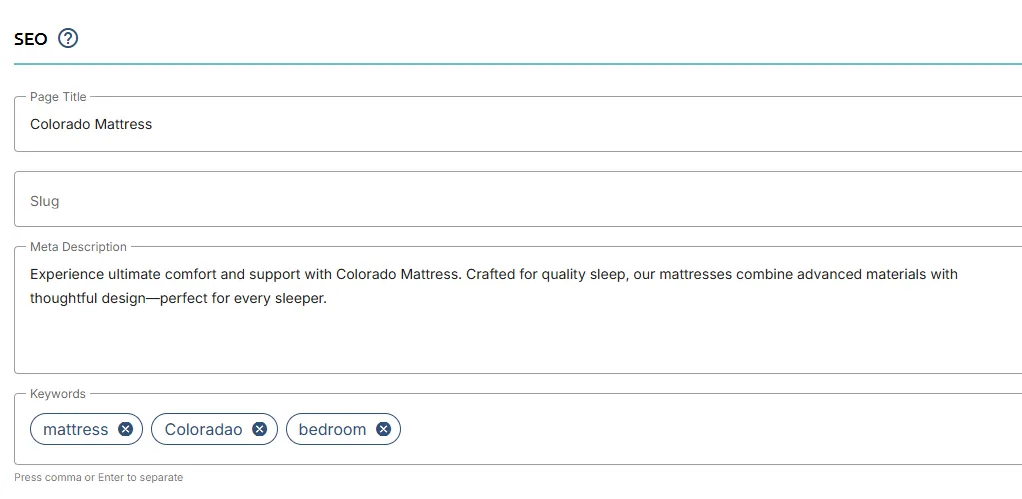
Under SEO, you are required to add the following details:
- Slug: Enter the unique part of the URL that identifies the product page against the user's search query.
- Page Title: Specify the SEO page title to optimize the product's appearance in search results. The page title should be descriptive and include important keywords related to your product, increasing its visibility and click-through rate in search engine results pages.
- Meta Description: Write a brief description of the page's content to influence click-through rates from search engine users.
- Meta Keywords: Input relevant SEO meta keywords to enhance search engine visibility. These keywords should accurately reflect the content and purpose of your product, helping search engines match your product with relevant search queries.
Schedule your Product
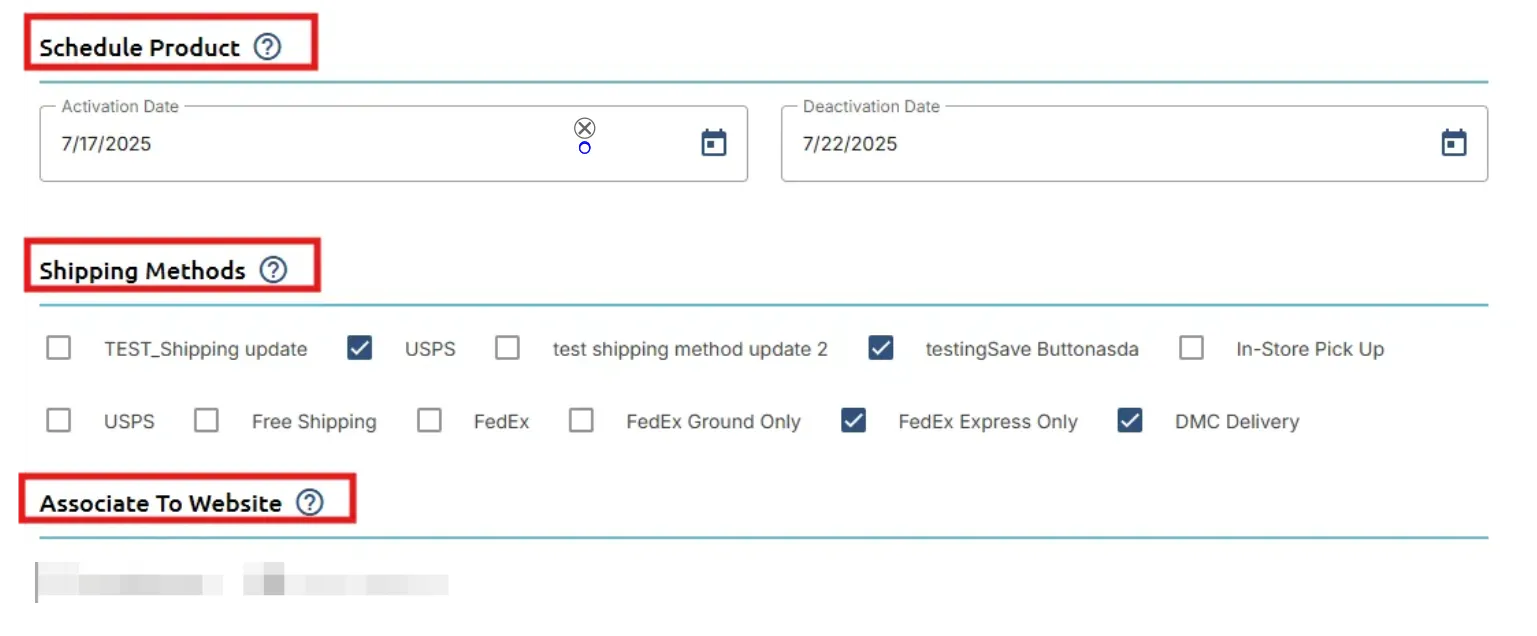
Navigate to the Schedule Product section in the right-hand navigation menu. Here, you can specify the Activation Date and Deactivation Date for your product.
- Activation Date: This is the date when your product becomes available for customers to purchase or access on the website. Once the activation date is reached, the product will be made visible and accessible to users, allowing them to place orders or interact with it as intended.
- Deactivation Date: Conversely, the deactivation date is the date when your product will no longer be available for purchase or access. After this date, the product will be automatically removed or hidden from the website, preventing further orders or interactions.
Add Shipping Methods
Select the shipping methods you want to enable for the product. These methods will determine how the product can be delivered to customers during checkout.
Associate to Website
Under the Associate to Website section, link the product to your website by selecting the appropriate site from the dropdown menu. This ensures that the product is correctly connected to the desired storefront within the PIM system.
Add Related Products
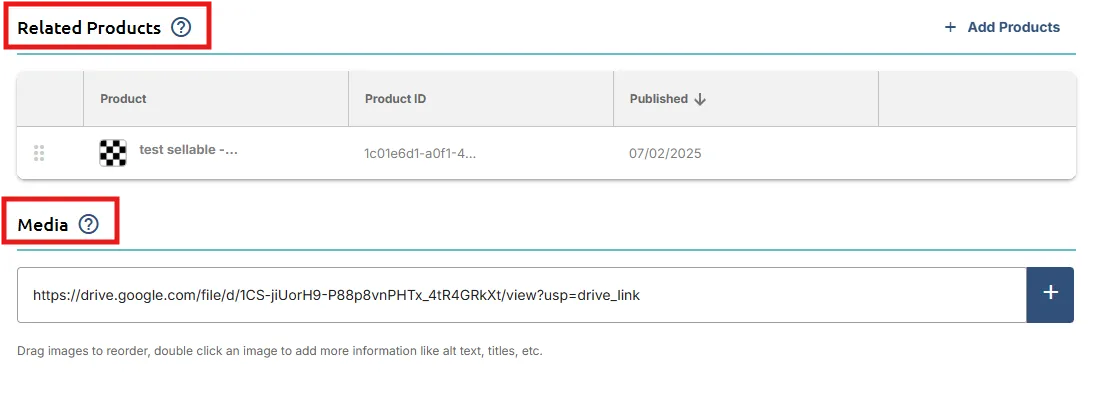
Under Related Products, include related products by clicking on Add Item. This will open a Catalog List Dialog.
Here, choose the appropriate products and add them. On your site, these will come up as suggestions/related products in conjunction with the created Product.
Add Media
In the Media section, upload relevant images or videos for the product. This includes product images, lifestyle photos, or promotional videos.
Step 5: Publish your Product
Once all Product details have been added, navigate to the Top-right of the page to access the following actions:
- Ready: Click Ready to mark the Product as Ready. This indicates that the Product is finalized and prepared for internal review.
- Publish: Click Publish to make the Product live on the UpStart Commerce Portal. This action officially releases the Product to your storefront, making it accessible and visible to end users. Any changes made before publishing will be instantly reflected once published.
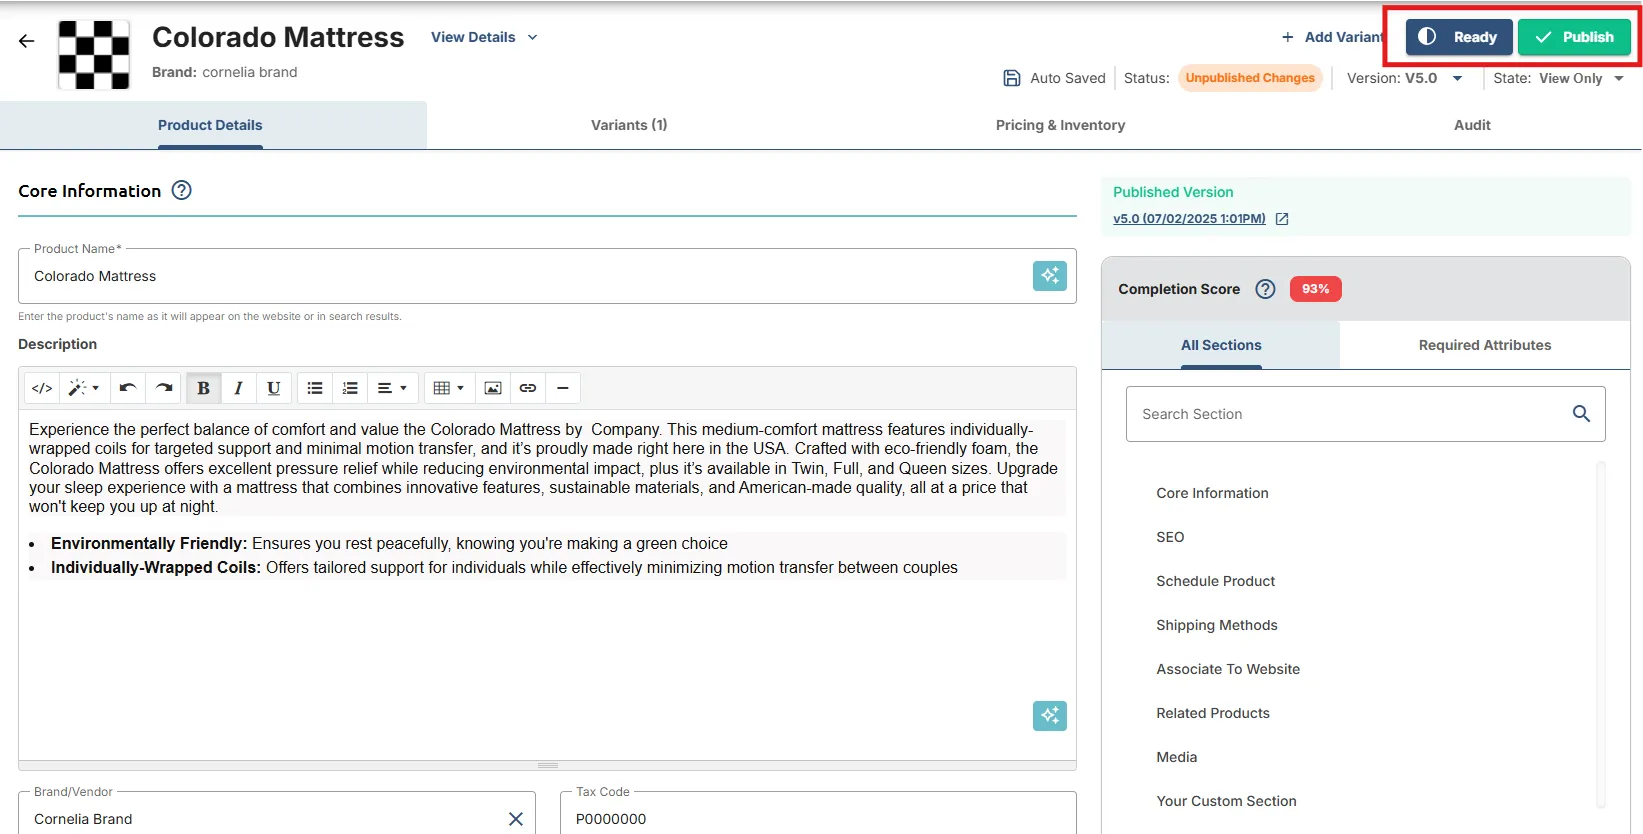
In case you want to add a variant to your product, go to Step 5.
Step 6: Add and Publish Product Variants (Optional)
To add product variants, navigate to the VARIANTS tab or click the + Add Variant button located in the top-right corner of the screen. This will open the Create Variant pop-up window, where you can enter the required details to create a new product variant.
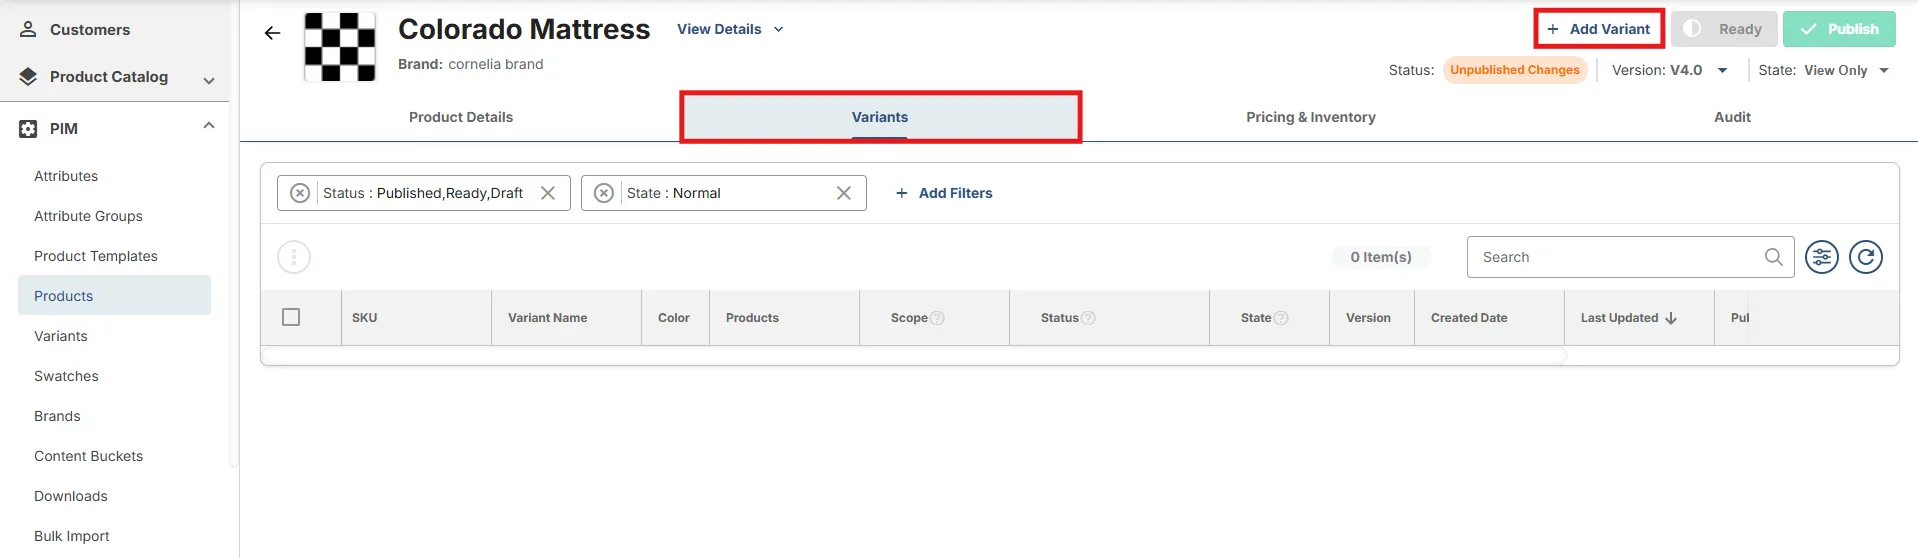
Under the Variant Information tab, fill in all the necessary details for each variant as described in the product creation steps. In addition to the information:
- Add SKU: Input a unique Stock Keeping Unit (SKU) for each variant to ensure accurate inventory tracking and management.
- Add Variant Name: Provide a clear and descriptive name for the variant (e.g., Size – Queen, Color – Blue) to help differentiate it on your site and backend.
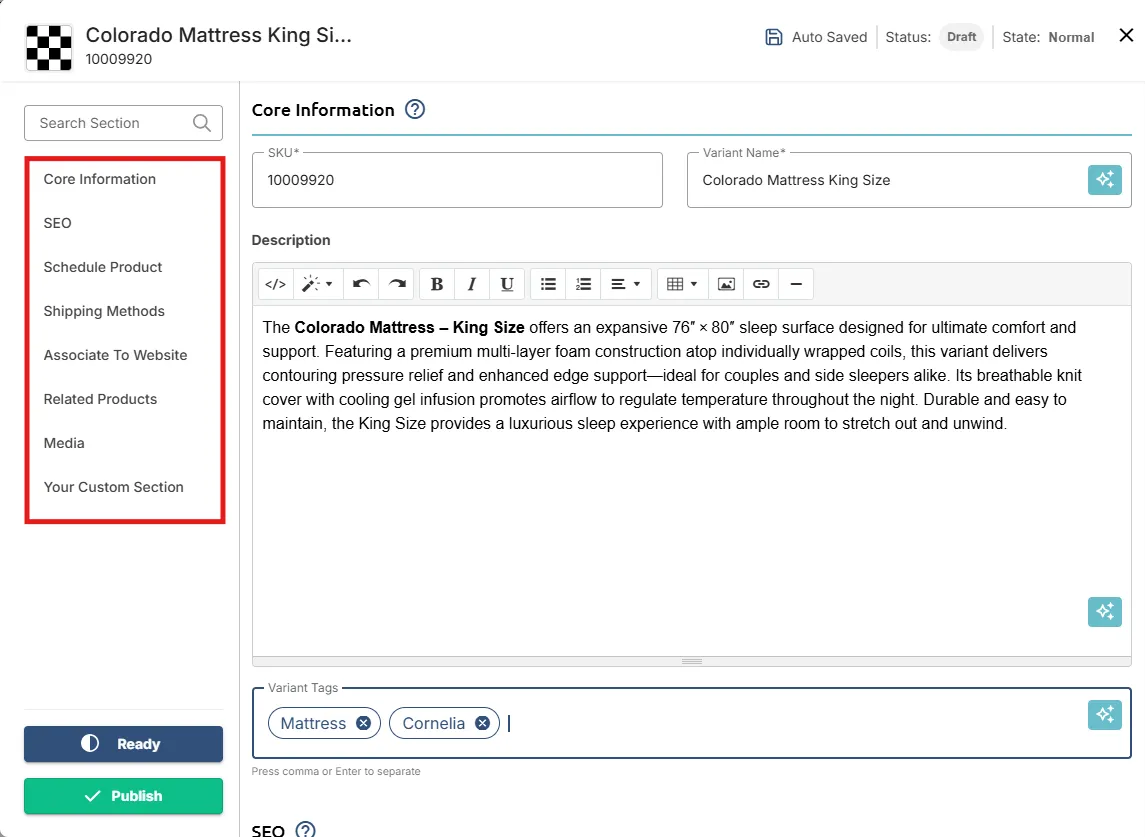
Publish your Variant
Once all variant details have been added, navigate to the bottom-left of the page to access the following actions:
- Ready: Click Ready to mark the variant as Ready. This indicates that the variant is finalized and prepared for internal review.
- Publish: Click Publish to make the variant live on the UpStart Commerce Portal. This action officially releases the variant to your storefront, making it accessible and visible to end users. Any changes made before publishing will be instantly reflected once published.
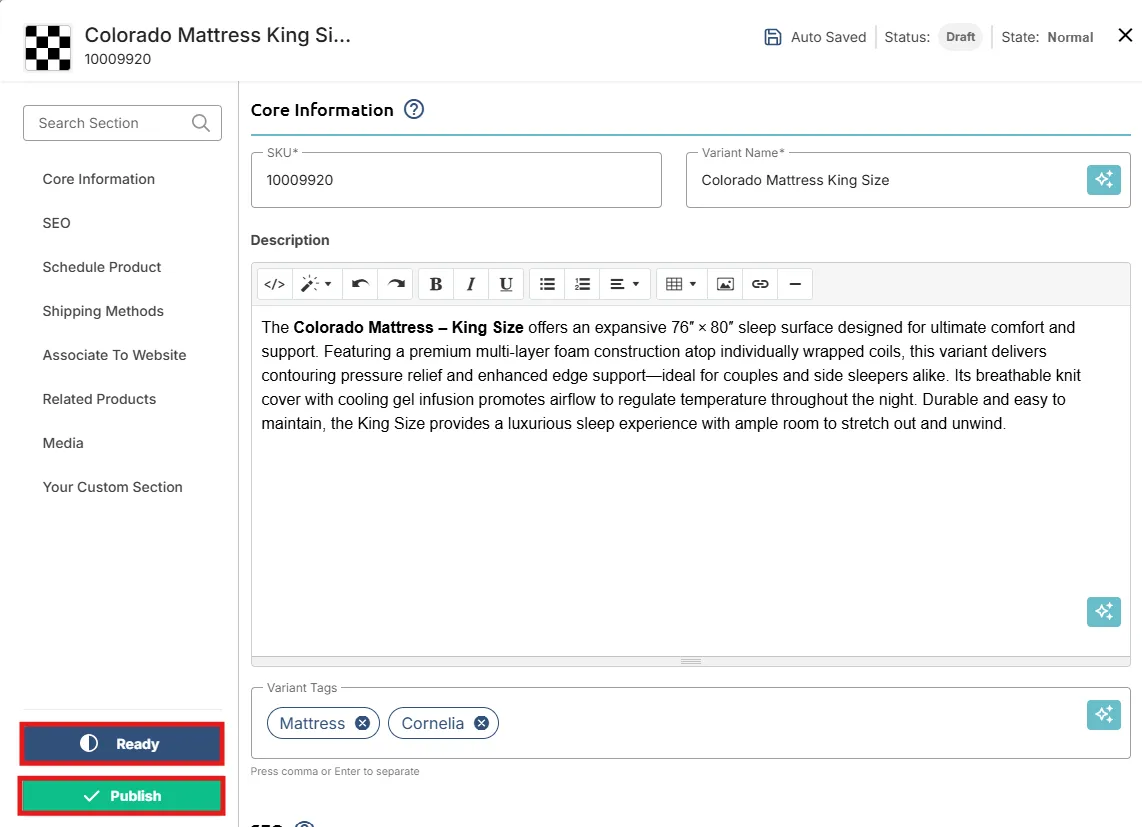
After successfully publishing the product, you can Edit or Archive the variants you created, if needed:
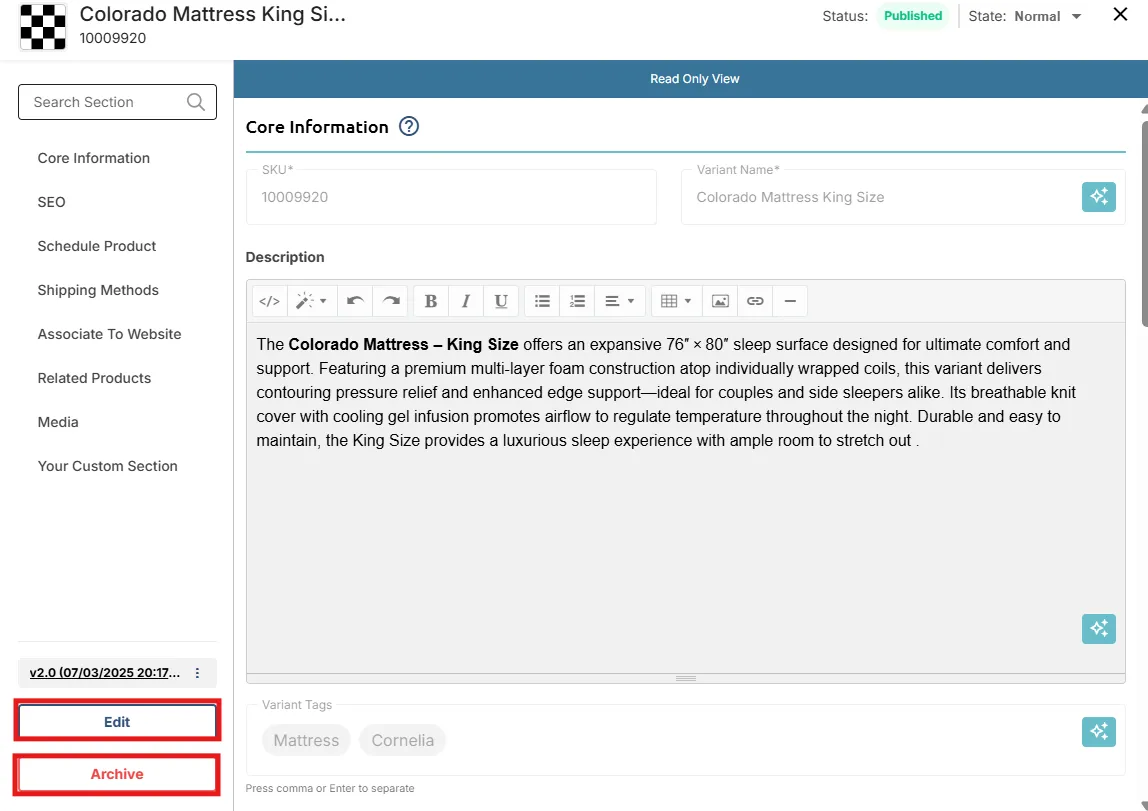
You can also set the state of your created variant.
Normal: The product is fully visible and available for purchase.
- View-only: The product is visible but cannot be purchased.
- Hidden: The product is not visible on the online portals.
- Archive: The variant is no longer active and is moved out of the product listing but retained for record-keeping or future reference.
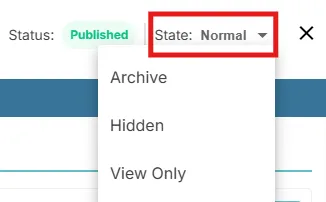
For more information on states, go to the PIM States guide.
Product Listing Page
On the Product Listing page, you will see three icons on the top below filters: Bulk Actions, Expand All and Bulk Download.
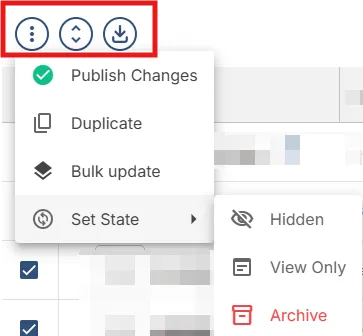
Bulk Actions
Select one or more products using the checkboxes, then click the Bulk Actions icon to reveal the available options:
- Publish Changes – Apply and push saved changes to the selected products.
- Duplicate – Create an exact copy of the selected product(s) for reuse or modification.
- Bulk Update – Modify multiple selected products at once.
- Set State – Manage visibility and accessibility of the selected products:
- Hidden:Temporarily remove the product from public view without deleting it.
- View Only:Make the product viewable but restrict further edits.
- Archive : Retire the product from active use while preserving it for reference.
Expand All
Click the Expand All icon to expand or collapse all product rows on the listing page. This allows you to view or hide detailed product information such as variants quickly.
Bulk Download
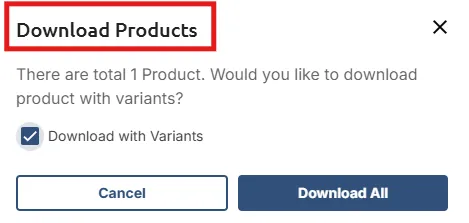
When you click the Bulk Download icon, all the products listed on the screen will be downloaded , check box with variants or not your choice and then they will be transfered to the download tab in the pim system. Go to Downloads and there will be a link provided to you where you can download it.
Note: When updating an existing product or variant, the system automatically generates a draft with the status "Edits in Published." This status indicates that a draft version exists, but your live product remains unchanged until you choose to publish. Saving as a draft lets you refine and review your updates without affecting the current published product. Once ready, you can publish the draft to apply your changes.
Duplicate SKU Creation for Archived SKUs
PIM allows users to create a duplicate SKU if the original SKU has been archived. Once a duplicated SKU has been published and is live, the original archived SKU cannot be recovered.